Monday, October 13, 2008
Article Alert - STC Guidelines for Evaluating Online Help
Though it has problems, this is an important article for me, for STC, and for Technical Writers in general. I'm planning on writing more about it soon, but for now, it is certainly worth reading (and perhaps more importantly) contemplating.
Friday, October 10, 2008
Coping with Conditions in Framemaker (Or, "How I Learned to Stop Worrying and Automate my Conditions in FrameMaker.")
I have a problem with my docs. In fact, I have many many problems with my docs...but in the interests of brevity (this statement will certainly be a joke by the time we are done), I'm going to limit this article to just one of the problems with my docs: how I cope with an absurd amount of conditions in FrameMaker.
Before we get into the nitty gritty, however, I'll cover a few salient details.
To avoid identifying the guilty, let's explain the problem by hypothetical example. Let's say I work for Widget Co, and we make all sorts of widgets. Our documentation deliverables for each widget consists of a mix of PDF and Online Help files. Furthermore, though each type of widget we sell shares a core amount of standard functionality, each also has a unique set of features and functionality. Based on this circumstance, I have a plethora of conditions in my source documents. I think I'm approaching 60 distinct ones. Maybe more. All sorts of crazy algebra goes into it. Unique conditions for Product A online, Product A PDF, Product B online, Product B PDF, Product A if used in conjunction with Product B (online and and PDF), etc etc etc. Believe me, the number of conditions grows very fast in my situation...but it works. Sort of.
The weak point in this approach is the author. It was simply taking me too long to apply and change all the conditions when I had to edit or write new content. Sure, the ol' CTRL+4 trick allows you to "quickly" apply conditions in FrameMaker...but in this case, "quickly" is a relative word, and after a week of doing it that way, my hands were contorted into claws from the repetition and pushing myself to do it faster and faster.
A further complication arose out of the sheer number of conditions I used: because we have so many conditions, I had to make the names of the conditions meaningful so that after a 3 month hiatus on a given document, I could look at the condition names and figure out what they were intended to do and how they were to be used. This meant that my condition names were long and descriptive. This, in turn, meant that it took a long time to apply a condition to a piece of text simply because of the length of the condition name I had to type. Believe me, I tried using short names and keeping a reference index that explained what each condition did...but that quickly resulted in a huge mess of incomprehensible condition tags and I was spending a long time checking and double-checking what condition "A1" was supposed to do in comparison to conditions "A2-A45". You probably catch my drift...
So, I went back to finding a method that allowed me to keep my condition names self-explanatory, yet would not impose a time burden on the author (me!) when applying them. Enter XKeys and AutoIT.
XKeys
XKeys is a special type of "macro keyboard" produced by P.I. Engineering. It's basically a blank keyboard with no labels on the keys. You can program the keys to do anything you want using the scripting software that comes with the keyboard. In fact, you can even assign a given key to a specific .exe file so that the file is executed when the key is pressed. PIEngineering (the makers of the XKeys keyboards) sends some nifty stickers that you can use to label each key. Scroll down a bit for an illustration of the XKeys keyboard that I use.
AutoIT
AutoIT is a Visual Basic-like scripting language that allows you to automate interaction with Windows and Windows software. It's free, and pretty powerful (if you can get over the stigma of working with something like Visual Basic in a software engineering group) for automating things in the Windows environment.
From the AutoIT website:
Once I got my XKeys keyboard I set about trying to make it useful. After poking around with their scripting interface a bit, I muttered a few choice expletives and gave up on it. Don't get me wrong, their scripting language and interface (MacroKeys) may be the cat's meow, and will allow you to script a lot of things without having to "program", but it just seemed to keep getting in my way. Perhaps it was because I wanted to approach the problem programmatically, but I didn't have the time budget to really dive in and learn MacroKeys. After all, I was already fairly confident AutoIT could do what I wanted, and I had a rough idea of the code it would take to do it. I just had to figure out how to tie the two together.
The solution is patently obvious, but it took me some trial and error. (Hey, I'm not a programmer, engineer, or one to quickly apprehend the obvious in most circumstances.) The trick was to write my script in AutoIT, compile it to an .exe file, and assign the .exe file to one of the keys on the XKeys keyboard. There's one more thing I wanted to do: I had to make sure that the script would only run when FrameMaker was active. After all, I didn't want to, for example, send a stream of keypresses to PhotoShop if I pressed an XKeys key accidentally. Since I knew that this was easy to do in AutoIT, I set about to write my first AutoIT script to apply a specifc condition to a FrameMaker document. Here's what the AutoIT code looks like for one condition (feel free to copy and paste into AutoIT to try it out. Mind you, you'll have to change the name of the actual condition used in the macro to suit your needs.):
Mind you, you can try out this AutoIT code without actually having an XKeys keyboard...you'll just have to run the .exe file manually. The problem with this is that it is likely that it won't do anything because as written, the script checks to make sure that FrameMaker is currently active. If it isn't, it won't run. So if you want to try out the script without an XKeys keyboard, you can tweak the AutoIT code to automatically activate the FrameMaker window before running the rest of the macro. The code would look like this:
Implementation 
Once I got the first condition working, the rest was easy:
Screencast
If you are having trouble understanding how effective using an XKeys keyboard with AutoIT can be, I made the following screencast showing how I can quickly manipulate a lot of conditions quickly.
Unfortunately, the video doesn't quite do the speed justice. I don't know whether I just had too many applications open or what, but my system was performing sluggishly all morning and the screencast recording software didn't improve things. Still, the video should give you a rough idea of what I'm talking about. When you see conditions being applied in the video, keep in mind that they are being applied and cleared by pressing specific keys on the XKeys keyboard.
Resources
Before we get into the nitty gritty, however, I'll cover a few salient details.
- I use FrameMaker 6.x for all my docs. Yes, I know it is old. Yes, I know more recent versions of FrameMaker have dramatically improved conditions... but some time ago I was told that I was not allowed to upgrade to a more recent version of FrameMaker. Rather than fight that system, I set out to find a better way of coping with conditions in FrameMaker 6.x.
- I both single source and shared source a sizable percentage of content. This is the only reasonable way for one person (me!) to even give the appearance of being able to manage, update, and work in so many documents across so many product lines. Because the terms "single source" and "shared source" are not always used consistently, I'll digress for a moment to define them in the context of this article:
The only way that it is possible for us (and by "us", I really mean "me") to manage this amount of documentation is by extensive use of conditional text. It quickly gets out of hand.
- Single-sourcing: Using one source document for producing
output in different formats. Of course in my case, we are
talking about hundreds of source files, any one of which contains
content used in both PDF and WebHelp output.
- Shared-sourcing: Using one source document for producing output for different product documents with overlapping features and functionality. As in the case of "single-sourcing" above, I am really talking about hundreds of source files here, any one of which can contain content shared amongst multiple product lines.
To avoid identifying the guilty, let's explain the problem by hypothetical example. Let's say I work for Widget Co, and we make all sorts of widgets. Our documentation deliverables for each widget consists of a mix of PDF and Online Help files. Furthermore, though each type of widget we sell shares a core amount of standard functionality, each also has a unique set of features and functionality. Based on this circumstance, I have a plethora of conditions in my source documents. I think I'm approaching 60 distinct ones. Maybe more. All sorts of crazy algebra goes into it. Unique conditions for Product A online, Product A PDF, Product B online, Product B PDF, Product A if used in conjunction with Product B (online and and PDF), etc etc etc. Believe me, the number of conditions grows very fast in my situation...but it works. Sort of.
The weak point in this approach is the author. It was simply taking me too long to apply and change all the conditions when I had to edit or write new content. Sure, the ol' CTRL+4 trick allows you to "quickly" apply conditions in FrameMaker...but in this case, "quickly" is a relative word, and after a week of doing it that way, my hands were contorted into claws from the repetition and pushing myself to do it faster and faster.
A further complication arose out of the sheer number of conditions I used: because we have so many conditions, I had to make the names of the conditions meaningful so that after a 3 month hiatus on a given document, I could look at the condition names and figure out what they were intended to do and how they were to be used. This meant that my condition names were long and descriptive. This, in turn, meant that it took a long time to apply a condition to a piece of text simply because of the length of the condition name I had to type. Believe me, I tried using short names and keeping a reference index that explained what each condition did...but that quickly resulted in a huge mess of incomprehensible condition tags and I was spending a long time checking and double-checking what condition "A1" was supposed to do in comparison to conditions "A2-A45". You probably catch my drift...
So, I went back to finding a method that allowed me to keep my condition names self-explanatory, yet would not impose a time burden on the author (me!) when applying them. Enter XKeys and AutoIT.
XKeys
XKeys is a special type of "macro keyboard" produced by P.I. Engineering. It's basically a blank keyboard with no labels on the keys. You can program the keys to do anything you want using the scripting software that comes with the keyboard. In fact, you can even assign a given key to a specific .exe file so that the file is executed when the key is pressed. PIEngineering (the makers of the XKeys keyboards) sends some nifty stickers that you can use to label each key. Scroll down a bit for an illustration of the XKeys keyboard that I use.
AutoIT
AutoIT is a Visual Basic-like scripting language that allows you to automate interaction with Windows and Windows software. It's free, and pretty powerful (if you can get over the stigma of working with something like Visual Basic in a software engineering group) for automating things in the Windows environment.
From the AutoIT website:
AutoIt v3 is a freeware BASIC-like scripting language designed for automating the Windows GUI and general scripting. It uses a combination of simulated keystrokes, mouse movement and window/control manipulation in order to automate tasks in a way not possible or reliable with other languages (e.g. VBScript and SendKeys). AutoIt is also very small, self-contained and will run on all versions of Windows out-of-the-box with no annoying "runtimes" required!XKeys + AutoIT = Nirvana (or at least a tangible improvement)
AutoIt was initially designed for PC "roll out" situations to reliably automate and configure thousands of PCs. Over time it has become a powerful language that supports complex expressions, user functions, loops and everything else that veteran scripters would expect.
Once I got my XKeys keyboard I set about trying to make it useful. After poking around with their scripting interface a bit, I muttered a few choice expletives and gave up on it. Don't get me wrong, their scripting language and interface (MacroKeys) may be the cat's meow, and will allow you to script a lot of things without having to "program", but it just seemed to keep getting in my way. Perhaps it was because I wanted to approach the problem programmatically, but I didn't have the time budget to really dive in and learn MacroKeys. After all, I was already fairly confident AutoIT could do what I wanted, and I had a rough idea of the code it would take to do it. I just had to figure out how to tie the two together.
The solution is patently obvious, but it took me some trial and error. (Hey, I'm not a programmer, engineer, or one to quickly apprehend the obvious in most circumstances.) The trick was to write my script in AutoIT, compile it to an .exe file, and assign the .exe file to one of the keys on the XKeys keyboard. There's one more thing I wanted to do: I had to make sure that the script would only run when FrameMaker was active. After all, I didn't want to, for example, send a stream of keypresses to PhotoShop if I pressed an XKeys key accidentally. Since I knew that this was easy to do in AutoIT, I set about to write my first AutoIT script to apply a specifc condition to a FrameMaker document. Here's what the AutoIT code looks like for one condition (feel free to copy and paste into AutoIT to try it out. Mind you, you'll have to change the name of the actual condition used in the macro to suit your needs.):
#include-once #cs ------------------------------------------------------------------ AutoIt Version: 3.1.1.0 Author: michael Script Function: Template AutoIt script. Script Name: WWHiPlash Version: 0.11 #ce ----------------------------------------------------------------------- #region --- Standard initialization stuff --- #include#region --- ScriptWriter generated code Start --- Opt("WinWaitDelay",100) Opt("WinTitleMatchMode",4) Opt("WinDetectHiddenText",1) Opt("MouseCoordMode",0) #endregion --- Standard initialization stuff --- If WinActive("Adobe FrameMaker+SGML") Then ; (above)Macro will only continue executing if FrameMaker is currently ; active. The text within quotes will have to be changed ; to match your current version of FrameMaker. (Above is ; for FrameMaker 6 + SGML. Look in the FrameMaker Window blue-bar or use ; the AU3Info tool that comes with AutoIT to see what text ; you need. Send("{CTRLDOWN}") Send("4") Send("{CTRLUP}") Send("some_condition_name") ; Text within quotes is the name of the condition ; that will be applied. Change it to fit your ; needs. Send("{ENTER}") EndIf
Mind you, you can try out this AutoIT code without actually having an XKeys keyboard...you'll just have to run the .exe file manually. The problem with this is that it is likely that it won't do anything because as written, the script checks to make sure that FrameMaker is currently active. If it isn't, it won't run. So if you want to try out the script without an XKeys keyboard, you can tweak the AutoIT code to automatically activate the FrameMaker window before running the rest of the macro. The code would look like this:
#include-once #cs ------------------------------------------------------------------ AutoIt Version: 3.1.1.0 Author: michael Script Function: Template AutoIt script. Script Name: WWHiPlash Version: 0.11 #ce ----------------------------------------------------------------------- #region --- Standard initialization stuff --- #include#region --- ScriptWriter generated code Start --- Opt("WinWaitDelay",100) Opt("WinTitleMatchMode",4) Opt("WinDetectHiddenText",1) Opt("MouseCoordMode",0) #endregion --- Standard initialization stuff --- WinActivate ("Adobe FrameMaker+SGML") WinWaitActive("Adobe FrameMaker+SGML")If WinActive("Adobe FrameMaker+SGML") Then ; (above)Macro will only continue executing if FrameMaker is currently ; active. The text within quotes will have to be changed ; to match your current version of FrameMaker. (Above is ; for FrameMaker 6 + SGML. Look in the FrameMaker Window blue-bar or use ; the AU3Info tool that comes with AutoIT to see what text ; you need. Send("{CTRLDOWN}") Send("4") Send("{CTRLUP}") Send("some_condition_name") ; Text within quotes is the name of the condition ; that will be applied. Change it to fit your ; needs. Send("{ENTER}") EndIf

Once I got the first condition working, the rest was easy:
Make a new script in AutoIT for each of my remaining conditions. Compile each script to an .exe file Assign each script executable to the appropriate XKeys keyboard key.
Screencast
If you are having trouble understanding how effective using an XKeys keyboard with AutoIT can be, I made the following screencast showing how I can quickly manipulate a lot of conditions quickly.
Unfortunately, the video doesn't quite do the speed justice. I don't know whether I just had too many applications open or what, but my system was performing sluggishly all morning and the screencast recording software didn't improve things. Still, the video should give you a rough idea of what I'm talking about. When you see conditions being applied in the video, keep in mind that they are being applied and cleared by pressing specific keys on the XKeys keyboard.
Resources
- Downloading AutoIT: Follow the link to the download page for AutoIT. I recommend that you download both the "AutoIT Full Installation" package and the additional "AutoIT Script Editor". The AutoIT Script Editor is a customized version of SciTE that provides a lot of extra features for simplifying scripting in AutoIT.
- Purchasing XKeys: Follow the link to P.I. Engineering's XKeys product pages. Search for the model you want, and follow the purchase instructions. Though XKeys products are apparently available in several retailers, I ordered mine through the website and recieved it a few days later via UPS. Specific purchasing instructions are available on this page.
Thursday, August 07, 2008
Article Alert
Tech Writers, Grammar, and the Prescriptive Attitude
by Bruce Byfield
Most technical writers are confused about grammar. On any day on the TECHWR-L list, basic questions are asked: "Is 'User's Guide' or 'Users' Guide' correct? Maybe 'Users Guide?'" "Should 'web' be capitalized when used to refer to the World Wide Web?" "Which is right: 'A FAQ' or 'an FAQ?'" Many of these questions become the major thread on the list for a day or two, generating far more debate than they're worth.
Read the full article here...
Saturday, February 16, 2008
Fixing FrameMaker
It is generally accepted that FrameMaker is one of the best tools for reliably authoring long documents. In this category of software, Microsoft Word isn't even a contender. Yet for all FrameMaker's many strengths, it still suffers from some rather annoying problems that can really throw a spanner into the works that is your writing. One of these FrameMaker problems is the size of some of its dialog windows, especially those used for selecting conditional text settings.
The main problem with these windows is that they are too small to show the full name of defined conditions. To add insult to injury, these dialog windows are not even resizable. What this means, in all practicality, is that if you have multiple conditions that share the first few characters, you will not be able to differentiate the conditions using Frame's dialog windows.
For example, the documents I work on have gone through several technical writers, share content for a variety of outputs (PDF and online Help) and between application families. In an effort to reign in the conditional text chaos, we've standardized our conditional text names. Now, all conditional text names use the following convention "mc_f__". Some typical conditions would be:
Granted, this convention is less than ideal for a number of reasons, but it was a big step forward from the hodgepodge of different conditions used previously.
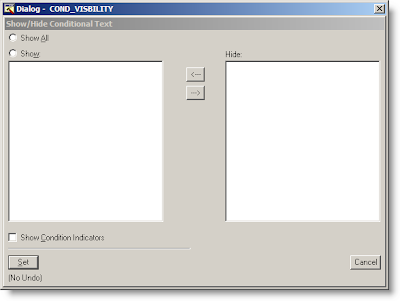
Below is a screen capture of the Show/Hide Conditional Text dialog used to select which conditions to show in a document:
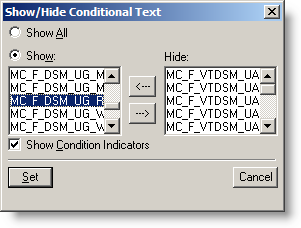
As you can see, this dialog is worse than useless...it is downright frustrating to use. The cells for Show and Hide just don't provide enough horizontal space to show the full names of the conditions. Fortunately, with a little resourcefulness and careful planning, you can resize these windows to just about any size that works for you. All you need is a little application called Resource Hacker and some patience.
Fixing FrameMaker with Resource Hacker
The first thing you'll need to do is to download Resource Hacker. This free tool is available from many sites offering freeware for download. The link at the bottom is just one such site.
Resource Hacker allows you to edit various program resource files (like .dll files) that contain the properties for many of the dialog (and other) windows used in an application. Fortunately for us, the FrameMaker's conditional dialog windows are housed in one such DLL.
Before editing the DLL in question, you first need to find it and make a safe backup copy of it that you can revert to in case of unforeseen problems. Mind you, I've been using a modified version of this DLL for quite some time and have yet to encounter any problem. . .but as with any such modification, your mileage may vary and there is no guarantee that such "hacks" won't result in a core meltdown of your computer, an increase in global warming, the downfall of western civilization, a rise in communism, inflation, etc... Be warned.
So now that you've been warned, here's the info you need to get started. The file you want is called fmdlg.dll and it is usually found in the following location:
C:\Program Files\Adobe\FrameMaker+SGML6.0\fminit\fmdlg.dll
Once you've made a backup copy of it, fire up Resource Hacker. Once it opens, navigate to and open the abovementioned fmdlg.dll file. You'll see that Resource Hacker utilizes the familiar tree/properties presentation scheme where the navigation tree on the left side of the screen allows you to choose between the various resources included in the DLL file while the right side details pane presents information on the selected resource.
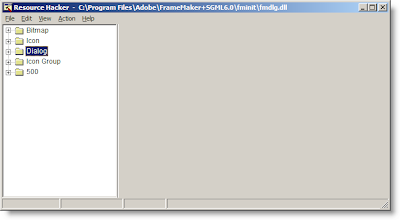
Expand the "Dialog" root and look for the COND_TEXT and COND_VISIBILITY branches. These are the two branches that contain the resources for the FrameMaker dialogs for applying conditional text and for showing and hiding conditional text.
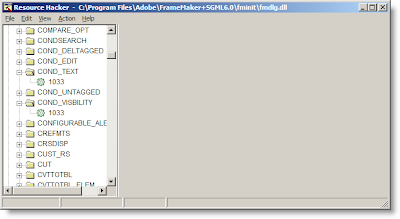
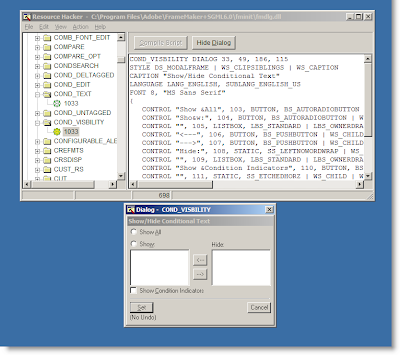
Expanding the COND_TEXT and COND_VISIBILITY branches reveals a resource numbered "1033" in each. I don't know what this number signifies. Perhaps it is the answer to life, the universe, and everything. Perhaps it is the number of angels that can dance on the head of a pin. Or perhaps it has some other more mundane significance. In any case, the number isn't important. The fact is that when you click the number, the details for the corresponding dialog window appear in the details pane of Resource Hacker and an editable preview of the selected dialog window also appears below.
Lets edit the Show/Hide Conditional Text window first, since it obscures more of the conditional tags and (AFAIK) there is no hotkey combination for revealing and hiding conditions equivalent to those used to apply and remove conditions. Without full visibility of your conditions, this window is indeed useless.
The first thing you'll need to do, if you haven't already, is click the "1033" resource in the "COND_VISIBILITY" branch of the Dialogs root in Resource Hacker. The result should be nearly identical to the screen capture above: the properties of the dialog will be displayed in the details pane of resource hacker and an editable preview of the dialog will appear at the bottom. (If you don't immediately notice the preview, check the lower right corner of your screen. For some reason on my machine, this is the default preview location for resources opened in Resource Hacker.)
You can resize the window either by dragging and moving the objects in the preview, or by editing the text in the details view of resource hacker. I'm going to leave it up to you which way you do it. Editing the text is faster for an expert, but if you are new to Resource Hacker, you'll probably want to expirament by resizing in the preview. Just one word of note, when you select an object or control in the preview, a red asterisk will appear next to the object's information line in the details pane. This will allow you to correlate which controls correspond to what information in the preview pane. Change a control (or window's) dimensions in the preview pane will change the information in the control or window's infromation in the preview pane correspondingly. Conversely, changing values directly in the details pane does not immediately update the preview. To see your changed values, you'll need to click the Compile Script button atop the details pane.
After some hacking, here is what I achieved: A window roughly twice as large in both the horizontal and vertical directions As you can see, I've resized the Show and Hide list boxes proportionally.
Once you've finished mucking around with your window, it's time to save your changes back to the fmdlg.dll file and test them out in FrameMaker. This is done by clicking Save in the file menu of Resource Hacker.
Now, the result in FrameMaker:
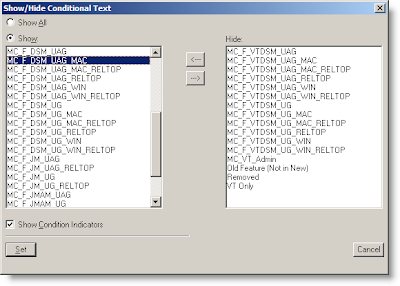 Ahhh... much better. Finally, I can see the full text of each condition. This makes selecting the which conditional text to show and hide much easier.
By following the same principals, I can resize the Conditional Text window as well:
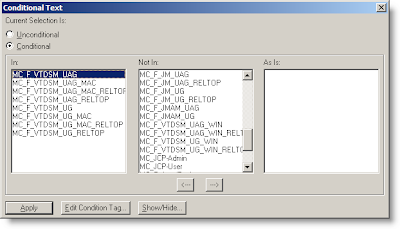 If you like how I've resized these windows, you can achieve the same results by replacing the details text in Resource Hacker with the appropriate text below, clicking Compile Script, and saving the results.
Conditional Text Dialog Settings
Show/Hide Conditional Text Dialog Settings
Resources Mentioned in this Article
The main problem with these windows is that they are too small to show the full name of defined conditions. To add insult to injury, these dialog windows are not even resizable. What this means, in all practicality, is that if you have multiple conditions that share the first few characters, you will not be able to differentiate the conditions using Frame's dialog windows.
For example, the documents I work on have gone through several technical writers, share content for a variety of outputs (PDF and online Help) and between application families. In an effort to reign in the conditional text chaos, we've standardized our conditional text names. Now, all conditional text names use the following convention "mc_f_
mc_f_app1_ug mc_f_app1_ug_mac mc_f_app1_ug_win mc_f_app1_uag mc_f_app1_uag_mac mc_f_app1_uag_win mc_f_app2
Below is a screen capture of the Show/Hide Conditional Text dialog used to select which conditions to show in a document:

Fixing FrameMaker with Resource Hacker
The first thing you'll need to do is to download Resource Hacker. This free tool is available from many sites offering freeware for download. The link at the bottom is just one such site.
Resource Hacker allows you to edit various program resource files (like .dll files) that contain the properties for many of the dialog (and other) windows used in an application. Fortunately for us, the FrameMaker's conditional dialog windows are housed in one such DLL.
Before editing the DLL in question, you first need to find it and make a safe backup copy of it that you can revert to in case of unforeseen problems. Mind you, I've been using a modified version of this DLL for quite some time and have yet to encounter any problem. . .but as with any such modification, your mileage may vary and there is no guarantee that such "hacks" won't result in a core meltdown of your computer, an increase in global warming, the downfall of western civilization, a rise in communism, inflation, etc... Be warned.
So now that you've been warned, here's the info you need to get started. The file you want is called fmdlg.dll and it is usually found in the following location:
C:\Program Files\Adobe\FrameMaker+SGML6.0\fminit\fmdlg.dll
Once you've made a backup copy of it, fire up Resource Hacker. Once it opens, navigate to and open the abovementioned fmdlg.dll file. You'll see that Resource Hacker utilizes the familiar tree/properties presentation scheme where the navigation tree on the left side of the screen allows you to choose between the various resources included in the DLL file while the right side details pane presents information on the selected resource.


The first thing you'll need to do, if you haven't already, is click the "1033" resource in the "COND_VISIBILITY" branch of the Dialogs root in Resource Hacker. The result should be nearly identical to the screen capture above: the properties of the dialog will be displayed in the details pane of resource hacker and an editable preview of the dialog will appear at the bottom. (If you don't immediately notice the preview, check the lower right corner of your screen. For some reason on my machine, this is the default preview location for resources opened in Resource Hacker.)
You can resize the window either by dragging and moving the objects in the preview, or by editing the text in the details view of resource hacker. I'm going to leave it up to you which way you do it. Editing the text is faster for an expert, but if you are new to Resource Hacker, you'll probably want to expirament by resizing in the preview. Just one word of note, when you select an object or control in the preview, a red asterisk will appear next to the object's information line in the details pane. This will allow you to correlate which controls correspond to what information in the preview pane. Change a control (or window's) dimensions in the preview pane will change the information in the control or window's infromation in the preview pane correspondingly. Conversely, changing values directly in the details pane does not immediately update the preview. To see your changed values, you'll need to click the Compile Script button atop the details pane.
After some hacking, here is what I achieved: A window roughly twice as large in both the horizontal and vertical directions As you can see, I've resized the Show and Hide list boxes proportionally.

Now, the result in FrameMaker:
 Ahhh... much better. Finally, I can see the full text of each condition. This makes selecting the which conditional text to show and hide much easier.
By following the same principals, I can resize the Conditional Text window as well:
 If you like how I've resized these windows, you can achieve the same results by replacing the details text in Resource Hacker with the appropriate text below, clicking Compile Script, and saving the results.
Conditional Text Dialog Settings
COND_TEXT DIALOG 33, 49, 400, 194
STYLE DS_MODALFRAME | WS_CLIPSIBLINGS | WS_CAPTION
CAPTION "Conditional Text"
LANGUAGE LANG_ENGLISH, SUBLANG_ENGLISH_US
FONT 8, "MS Sans Serif"
{
CONTROL "Current Selection Is:", 104, STATIC, SS_LEFTNOWORDWRAP | WS_CHILD | WS_VISIBLE | WS_GROUP, 3, 2, 188, 9
CONTROL "&Unconditional", 105, BUTTON, BS_AUTORADIOBUTTON | WS_CHILD | WS_VISIBLE | WS_GROUP | WS_TABSTOP, 3, 15, 56, 10
CONTROL "&Conditional", 106, BUTTON, BS_AUTORADIOBUTTON | WS_CHILD | WS_VISIBLE, 3, 26, 48, 10
CONTROL "", 107, STATIC, SS_ETCHEDFRAME | WS_CHILD | WS_VISIBLE | WS_GROUP, 3, 39, 393, 135
CONTROL "In:", 108, STATIC, SS_LEFTNOWORDWRAP | WS_CHILD | WS_VISIBLE | WS_GROUP, 9, 42, 56, 9
CONTROL "", 109, LISTBOX, LBS_STANDARD | LBS_OWNERDRAWFIXED | LBS_HASSTRINGS | LBS_NOINTEGRALHEIGHT | WS_CHILD | WS_VISIBLE | WS_GROUP | WS_TABSTOP, 9, 52, 120, 100
CONTROL "Not In:", 110, STATIC, SS_LEFTNOWORDWRAP | WS_CHILD | WS_VISIBLE | WS_GROUP, 141, 42, 56, 9
CONTROL "", 111, LISTBOX, LBS_STANDARD | LBS_OWNERDRAWFIXED | LBS_HASSTRINGS | LBS_NOINTEGRALHEIGHT | WS_CHILD | WS_VISIBLE | WS_GROUP | WS_TABSTOP, 141, 52, 120, 100
CONTROL "As Is:", 112, STATIC, SS_LEFTNOWORDWRAP | WS_CHILD | WS_VISIBLE | WS_GROUP, 271, 42, 56, 9
CONTROL "", 113, LISTBOX, LBS_STANDARD | LBS_OWNERDRAWFIXED | LBS_HASSTRINGS | LBS_NOINTEGRALHEIGHT | WS_CHILD | WS_VISIBLE | WS_GROUP | WS_TABSTOP, 271, 52, 120, 100
CONTROL "<---", 114, BUTTON, BS_PUSHBUTTON | WS_CHILD | WS_VISIBLE | WS_GROUP | WS_TABSTOP, 181, 157, 18, 13    CONTROL "--->", 115, BUTTON, BS_PUSHBUTTON | WS_CHILD | WS_VISIBLE | WS_GROUP | WS_TABSTOP, 211, 157, 18, 13
CONTROL "&Apply", 100, BUTTON, BS_DEFPUSHBUTTON | WS_CHILD | WS_VISIBLE | WS_GROUP | WS_TABSTOP, 3, 179, 50, 13
CONTROL "&Edit Condition Tag...", 101, BUTTON, BS_PUSHBUTTON | WS_CHILD | WS_VISIBLE | WS_GROUP | WS_TABSTOP, 61, 179, 72, 13
CONTROL "&Show/Hide...", 102, BUTTON, BS_PUSHBUTTON | WS_CHILD | WS_VISIBLE | WS_GROUP | WS_TABSTOP, 141, 179, 50, 13
CONTROL " ", 103, STATIC, SS_LEFTNOWORDWRAP | WS_CHILD | WS_VISIBLE | WS_GROUP, 1333, 1231, 0, 0
CONTROL "Conditional Text", 116, STATIC, SS_LEFTNOWORDWRAP | WS_CHILD | WS_VISIBLE | WS_DISABLED | WS_GROUP, 0, 0, 0, 0
}
Show/Hide Conditional Text Dialog Settings
COND_VISBILITY DIALOG 33, 49, 372, 230
STYLE DS_MODALFRAME | WS_CLIPSIBLINGS | WS_CAPTION
CAPTION "Show/Hide Conditional Text"
LANGUAGE LANG_ENGLISH, SUBLANG_ENGLISH_US
FONT 8, "MS Sans Serif"
{
CONTROL "Show &All", 103, BUTTON, BS_AUTORADIOBUTTON | WS_CHILD | WS_VISIBLE | WS_GROUP | WS_TABSTOP, 3, 2, 180, 10
CONTROL "Sho&w:", 104, BUTTON, BS_AUTORADIOBUTTON | WS_CHILD | WS_VISIBLE, 3, 16, 33, 10
CONTROL "", 105, LISTBOX, LBS_STANDARD | LBS_OWNERDRAWFIXED | LBS_HASSTRINGS | LBS_NOINTEGRALHEIGHT | WS_CHILD | WS_VISIBLE | WS_GROUP | WS_TABSTOP, 3, 27, 152, 146
CONTROL "<---", 106, BUTTON, BS_PUSHBUTTON | WS_CHILD | WS_VISIBLE | WS_GROUP | WS_TABSTOP, 178, 33, 18, 13    CONTROL "--->", 107, BUTTON, BS_PUSHBUTTON | WS_CHILD | WS_VISIBLE | WS_GROUP | WS_TABSTOP, 178, 50, 18, 13
CONTROL "Hide:", 108, STATIC, SS_LEFTNOWORDWRAP | WS_CHILD | WS_VISIBLE | WS_GROUP, 216, 17, 18, 9
CONTROL "", 109, LISTBOX, LBS_STANDARD | LBS_OWNERDRAWFIXED | LBS_HASSTRINGS | LBS_NOINTEGRALHEIGHT | WS_CHILD | WS_VISIBLE | WS_GROUP | WS_TABSTOP, 216, 27, 152, 146
CONTROL "Show &Condition Indicators", 110, BUTTON, BS_AUTOCHECKBOX | WS_CHILD | WS_VISIBLE | WS_GROUP | WS_TABSTOP, 3, 182, 180, 10
CONTROL "", 111, STATIC, SS_ETCHEDHORZ | WS_CHILD | WS_VISIBLE | WS_GROUP, 3, 196, 179, 1
CONTROL "&Set", 100, BUTTON, BS_DEFPUSHBUTTON | WS_CHILD | WS_VISIBLE | WS_GROUP | WS_TABSTOP, 3, 203, 30, 13
CONTROL "Cancel", 101, BUTTON, BS_PUSHBUTTON | WS_CHILD | WS_VISIBLE | WS_GROUP | WS_TABSTOP, 339, 203, 30, 13
CONTROL "(No Undo)", 113, STATIC, SS_LEFTNOWORDWRAP | WS_CHILD | WS_VISIBLE | WS_GROUP, 3, 219, 34, 9
CONTROL "&Help", 112, STATIC, SS_LEFTNOWORDWRAP | WS_CHILD | WS_VISIBLE | WS_GROUP, 1333, 1231, 0, 0
CONTROL "Show/Hide Conditional Text", 102, STATIC, SS_LEFTNOWORDWRAP | WS_CHILD | WS_VISIBLE | WS_DISABLED | WS_GROUP, 0, 0, 0, 0
}
Resources Mentioned in this Article
- Adobe FrameMaker ($$$)
- ResourceHacker (free)
Sunday, February 10, 2008
Simultaneous Document Development and Production
One major flaw I've found with many documentation packages is the fact that you cannot work on your source documents while you are building your documents. Let's take Web Works Publisher 2003 (WWP2003) for example. It's one of the better Help Application Tools (HATs) out there, and due to the early teething problems exhibited by its replacement (ePublisher 9.x), I'm still not ready to migrate from WWP2003 to its more recent replacement. For those of you that don't know, WWP2003 integrates with FrameMaker or (*gasp*) Microsoft Word. To use it, you define your output format (WebHelp, CHM, JavaHelp, etc...) and map all your source FrameMaker styles to your WWP2003 output styles.
When it's time to build your project, you simply press the build button in WWP2003, and it churns away for an inexorably long period of time while building your project. Unfortunately, while it is churning away, you can't continue to work in FrameMaker. That means lots of down-time while you are waiting for projects to build. If you have a number of projects to build, it can easily mean that you are stuck for possibly several days just building your projects. What's worse is because Quadralay wants to sell you additional applications, you can't tell WWP2003 to build several of your projects. You have to let it build one project, wait, then open another project and click Build, wait, then open another project and click Build, etc... This is an intolerable problem with many (most?) HATs out there. I draw attention to WWP2003 not because it is unique in this respect, but because it is the HAT I am currently using.
The problem with this approach is twofold: First, since it essentially locks FrameMaker, you can't continue your development work while it is building. This means that even if WWP2003 is building Project 1, you can't even work on Project 2 until it finishes building. Ack. Secondly, if you need to build multiple projects, you have to actively monitor the build process so that when it finishes building Project 1, you can manually open and start building Project 2. This sucks...but there is a way around it.
Virtualize your Build Environments
You can virtualize your build environment and free yourself from the tedium of waiting for your projects to build. If you haven't yet worked with virtualization, it sounds much more complex than it really is. Virtualization essentially allows you to run a "virtual" operating system in a window on your host operating system. This host operating system can be your development computer, or it can be hosted on another server or computer in your environment. Though the virtual operating system runs in a window on another operating system, it is for all intents and purposes another computer...only a virtual one, since it shares the hardware of an already existing computer. OK, it still sounds pretty complex if you haven't done it before...but trust me, it is pretty easy and your learning curve is likely to be more than a few minutes once you see how it all works.
When virtualizing your build environments, you'll need to make sure you do a few things right off the bat:
1) Mirror your directory structures
What is important here is that you mirror your documentation directory structures on your Virtual Machine. By this I mean that if you keep all your files for your projects in D:\Projects\Layouts and D:\Projects\Artwork...you'll want to create duplicate folders (even if empty) on your Virtual Machine.
2) Install your HAT software
Install your HAT software on the virtual machine. If you are using WWP2003, you'll need to install WebWorks Publisher Pro 2003 and FrameMaker. Depending on the licenses of your HAT software, you may have to shell out some money for this. If you need to justify the expense of this to management (who doesn't?), just figure out how much time it takes you to build each project and figure out how much time you'll be able to recapture per week, month, year, etc... by being able to work and build your output simultaneously. The RoI should be pretty low and easy to calculate.
3) Install Microsoft SyncToy
Microsoft SyncToy is an "intelligent" file copy tool. What's more, it is free. There are only a few options to it, and even fewer that you'll need to use. I've set mine up to copy the root directory of my development folder structure (D:\Projects\) using "Echo" copy. What this will do is mirror all the files and folders on the D:\Projects directory of my development machine to the D:\Projects directory of my Virtual Machine. If I delete a file on my development machine, it gets deleted on my virtual machine the next time I run SyncToy. If I create a new file on my development machine, it gets copied over to my Virtual Machine the next time I run SyncToy. What's more important, SyncToy is smart enough to only copy the files from my development machine that are no longer identical to those found on my virtual machine. Since my development folder contains about 12Gigs of FrameMaker files and source (.eps) graphic files, its a relief not to have to copy ALL of them over when I need to make some new builds.
4) Keep it lean
You are going to be using the VM only to build your projects. You don't need to install your favorite media player, or your favorite image editing software. Only install those components that you need to actually build (not develop) your projects. Use Add/Remove Programs to remove any crapwhere that gets installed by default.
Once you've set up your Virtual Machine, you are pretty much good to go. When you want to build a bunch of projects, just launch your VM, use SyncToy to sync your development files to the VM, and start building your projects. You can continue working on your development machine because your HAT on your build machine is working from a duplicate set of files.
There are, of course, some drawbacks to this approach. The first is cost. Due to licensing restrictions, you may have to pay for extra licenses for Windows and your HAT software. For me this was a non-issue because we have access to licenses for Windows through our development group (of which I am a part) and we had some older licenses for our HATT software that were not being used. Your mileage may vary though. The second potential problem with this setup is resource consumption. If you are hosting your Virtual Machine on your development box, you'll want to make sure you have lots of RAM and some extra CPU cycles to spare. I've done this in the past and while I've found my development machine to be somewhat slowed down, it was still perfectly usable so long as I didn't open Photoshop and decide that I wanted to edit a bunch of .eps files. If possible, consider hosting your VM on a spare computer somewhere. Your engineering group may even have some servers dedicated to hosting virtual machines somewhere. Depending on their hardware, you may even find building your projects on the VM is faster than building them on your production machine!
Some of you might be asking the obvious right about now, "If I have an extra computer laying around, why should I much around creating a Virtual Machine?" Well, the answer to that will depend on a few things I suppose. First off, there's no reason why you can't just use your spare hardware as duplicate build machine and use sync toy to keep them both in sync. In 99% of the cases, using dedicated hardware will improve your build times. However, with a Virtual Machine you will have increased portability. As you retire and aquire new computers, you won't have to consistenly recreate a duplicate build machine. All you'll have to do is copy your VM over to the new computer and launch it. Going to be on the road for a while, just copy your VM to a laptop and take your projects and HAT with you. For me, the portability issue outweighs the speed issue. Once I offload my builds to my Virtual Machine, I don't really care that it takes 25% more time to build since I can continue working while things are building. If I have something that needs to be built ASAP, there's no reason why I can't build it directly on my production machine...and sometimes I have to this.
One last thing I'd like to mention in regards to "Why Virtualize?" This may be a huge deal to some, and not at all interesting to others...but the last reason to consider virtualizing a build machine is Operating System Independence. When you have a VM, you can run your Windows build machine on any OS that can run a virtual machine. (...providing that you stick within the same virtualization player vendor. For example, I wouldn't expect to be able to run a Parallels Virtual Machine on VMWare Player.) . At home, my OS is Ubuntu...but I can still work/build my projects on Linux using VMWare server to launch my virtual build machine. As of today, VMWare provides virtual machine players for a host of operating systems including Mac OS X, Linux (many flavors), Windows, Sun, etc... Chances are that if you use it, there's a VM player for it.
The one downside not addressed thus far by using a Virtual Machine is the fact that you still have to manually monitor your VM if you are building multiple projects. This is somewhat alleviated by the fact that you can still work on your development machine while building projects on your virtual machine...but is still somewhat of a pain. Fortunately, there is help in this regard.
Automate your Build Processes
You can "easily" automate building multiple projects using some pretty simple scripting tools. I kind of fell in to using AutoIT to automate my builds, but there are other tools out there to accomplish the same thing. I'm working on an article right now that explores using AutoIt for build automation. I'm not done with it yet, but if interested, keep your eyes on the blog.
Resources Mentioned in this Article
- AutoIT (free)
- Microsoft SyncToy (free)
- VMWare Player (free)
- WebWorks Publisher Pro 2003 ($$$ - no longer available/supported)
- ePublisher ($$$)
Thursday, January 31, 2008
DataHand Defunct?

Sad news, folks. It looks like DataHand Systems is teetering on the edge, and is no longer selling the futuristic DataHand keyboard. Their rather cyptic message on their webpage says:
DATAHAND SYSTEMS, INC. ANNOUNCES IT IS NO LONGER MARKETING AND SELLING THE DATAHAND ERGONOMIC KEYBOARDUnfortunately our supplier has advised us they can no longer produce the DataHand Ergonomic Keyboard and until a new manufacturer can be identified and is in production, the company will no longer offer the DataHand Keyboard for sale. The 90 day warranty will be honored for units shipped since October 28, 2007.
There is no mention if there is any hope of finding another manufacturer.

Saturday, January 26, 2008
Why PDFs Suck
Though it stands for Portable Document Format, PDF might as well stand for Printable Document Format. That's because printing is just about the only thing a PDF is good for.
OK, that might sound a little harsh... but for reasons well elucidated elsewhere, PDF is a poor choice of document if:
Most technical documentation for software falls into the above categories. This isn't to say that there is no place for PDFs in technical communication...it is just to say that PDFs should be used for what they do best: facilitating the printing of content.
When I try to read PDFs online, I regularly encounter the following:
If you are writing technical documentation, single sourcing to both web and PDF should be on your roadmap...as it is the right thing to do for your readers. If you have to choose between one format or another, think long and hard about it. Go PDF-only and you make all your documentation that much less accessible, but placate those who would want to print it. Go HTML-only and you'll be doing right by your users (even if they don't know it), but prepare to hear people complain if you don't provide an easy mechanism to print out all the content (a feature that is sorely lacking from most web help systems).
OK, that might sound a little harsh... but for reasons well elucidated elsewhere, PDF is a poor choice of document if:
- The document is longer than a few pages in length
- The document is going to be read online
Most technical documentation for software falls into the above categories. This isn't to say that there is no place for PDFs in technical communication...it is just to say that PDFs should be used for what they do best: facilitating the printing of content.
When I try to read PDFs online, I regularly encounter the following:
- Acrobat hangs Firefox. Yeah, isn't it lovely having to kill the Firefox process, relaunch Firefox, find the page with the link to the PDF, and try to open it again just to find that one piece of information I need to accomplish what it is I am trying to do.
- Acrobat hangs itself. This doesn't happen as often as the above, but it IS still frequent enough to give me that "will it work this time?" feeling any time I open a PDF.
- In addition to that, if I do get the PDF open without crashing anything, I have to search the document. Opening the PDF to the cover or title page doesn't do anything for me. Searching, of course opens a sidebar search that inevitably obscures some of the content. This sidebar, is, of course, persistent... If I go to search another PDF document, the same search term from the first PDF is still in the sidebar.
- Some PDFs are constructed to dynamically download content from the web as I jump from page to page. This is infuriatingly slow and cumbersome.
- Using the sidebar scroll control to scroll vertically throughout a PDF document jumps between pages. Why can't it scroll the document as I move the location bar?
- If the PDF opens embedded in the web browser, it breaks all sorts of usability features I've come to rely on. What does File->Print do in the menu? What does File-> Save do in the menu? Why doesn't it ever do what it should?
- It inserts another toolbar in the browser that I'm not used to working with. On top of that, it's cluttered with buttons I never use (unless it's the Save button that I inevitably use AFTER trying File-> Save).
- Toolbar buttons use non-standard metaphors. Why is the Search button a set of binoculars and not a magnifying glass like every other Search button? Every time I look for the Search button in Acrobat, I see the binoculars and it registers as some sort of Zoom feature and not a search feature.
If you are writing technical documentation, single sourcing to both web and PDF should be on your roadmap...as it is the right thing to do for your readers. If you have to choose between one format or another, think long and hard about it. Go PDF-only and you make all your documentation that much less accessible, but placate those who would want to print it. Go HTML-only and you'll be doing right by your users (even if they don't know it), but prepare to hear people complain if you don't provide an easy mechanism to print out all the content (a feature that is sorely lacking from most web help systems).
Sunday, January 20, 2008
Top 12 Non-Expert and Non-Solicited Pieces of Advice on Technical Writing
12) You should not type with your eyes closed.
-- OK. Fair enough. Nobody is saying that you should type with your eyes closed. However, there is no reason why you can't type with your eyes closed if you want to (providing that you know how to touch-type). If you've ever been inspired, or trying to transfer a perfect model of a concept held in your brain through your fingers and onto the screen, you'll know that everything else in the world is nothing but a distraction. ...and you'll realize that sometimes, the best thing...and perhaps the only thing that you can do to avoid losing the thought is to close your eyes and write. Of course, if you've never had this experience, there is no reason why you'd ever need to or want to close your eyes while typing...and even less likelihood that you'd understand what someone was doing if you saw them typing with their eyes closed.
11) Dense content is better because it is shorter.
-- If dense content increases complexity, cognitive load required to understand the topic, diminishes the accessibility of information within the content, and generally destroys any semblance of usability, then dense content is definitely NOT better. I've had more than one person (none of them writers) hold up the most compacted, impenetrable piece of gobbledygook to me as a model of how technical content should be written, and roll their eyes when the same content is revised for usability and understandability. In this context, the opposite of dense content would be content that has been revised by breaking information out into task, reference, and concept sections; content that has been reworked by chunking information, making use of parallel structure, increased whitespace, logical headings, etc... Such content often has a higher aggregate page count than the same information compacted into a block of text so tight that it is near impenetrable for the reader (and damn near impossible to maintain and change without springing the whole works).
10) Technical writing is easy. Just do it this way: _____________.
-- We've all been there. Schmitty's Law states that the less informed someone is on the theory or praxis of technical communication, the more amusing "their way" will be. The corollary to Schmitty's Law states that the more amusing "their way" is, the more vehemently they will argue for the immediate adoption of their approach and the less willing they will be to consider other approaches.
9) A low page count is more important than comprehensive content.
-- "Anything said in 40 pages would instead be better said in 10. (Regardless of the scope of material covered.) If it is not possible to decrease page count, consider changing font size, line spacing, and page margins to accommodate the requirement." If you've ever been the recipient of such myopic advice, you were probably damn near apoplectic thinking of how to even respond.
8) Users don't read documentation.
-- Even in the face of direct evidence to the contrary, people will still spout this adage and attempt to use it in order to justify doing "very bad things" to the resident technical writer, or asking him/her to do "very bad things" to the reader. An example of this would be, "Since users don't read documentation anyways, let's remove all task oriented procedures from the online help." Of course, the kernel of truth to this statement is that a) users quickly learn to avoid poorly written, dense, and inaccessible documentation and b) users do not read a user's guide, online help system, etc... cover to cover. They look for topics relevant to their current context.
7) You don't need to know when the software will be released in order to schedule your efforts.
-- Documentation should "just be ready" whenever the software is ready. This is sometimes called the jack-in-the box method of technical writing. That is, the tech writer cranks and cranks and cranks away on his/her projects and one day, SURPRISE! The software is posted to the web and we've released with nary a warning.
6) You don't need specifications to write software documentation.
-- Our software is so easy, you don't need specifications. In fact, users probably won't even need to read the documentation anyways...so you shouldn't need a specification to write it. This is a classic, and is usually the mantra of the engineers and experts who design the software in the first place. Needless to say, more often than not, the software is pretty darn complex when mere mortals are asked to use it.
5) You shouldn't use "you" in technical documentation.
-- Use of "you" is not formal enough for technical documentation. This seems to be a holdover from fifth-grade composition classes devoted to some ridiculous paradigm of "formal writing". Granted, there is no need to superfluously use "you" if a reference to the reader is not needed, but in some situations you can't avoid using it without sacrificing clarity and usability upon the alter of some misguided notion of formality.
4) The imperative voice is insulting to readers.
-- A task or procedure step should avoid being constructed in the imperative voice, "because it's insulting." I was told this by someone who then added, "I mean really, who are YOU to tell ME what to do!?!?" Uh, ok....
3) Users don't want to be told how to do anything. Instead, they just want the bare facts, and they will figure out everything else on their own.
-- Despite all the research to the contrary, this lovely gem comes up again and again. Reference material on window and system objects is all anyone needs to figure out everything they can do with the software. This bit of advice is often used in conjunction with numbers 4 and 2 in an attempt to advocate for number 11.
2) Everything can and should be reduced to a diagram with callouts.
-- There's no need for tasks/procedures. All a user needs is a screen-shot or diagram with callouts describing the main elements of the application/window/procedure/etc.... Everything else, the user can figure out on his/her own.
1) You are not allowed to cut and paste content.
-- Yes, I encountered this little bit of wisdom quite recently. I was even told I was "fooling readers" by making them read something twice, and that in general, "cut and paste is evil". That "cut and paste is evil" is, in fact, an adage that I agree with...when it comes to writing code. However, look at any number of competently written online help systems, user guides, etc... and you will see that content re-use is an essential element of technical communication. The idea that one cannot or should not cut and paste in technical documentation is about as ridiculous as it is misinformed. It's even more ridiculous when many a HATT has built-in support for managing content reuse.
Subscribe to:
Posts (Atom)